Introduction to software testing
As a good developer we also need a skill to test our app in order to make our app free from bug and help us handle certain kind of posibility. but testing manually is not a good option when you have a large application which has a lot of fungsionality, it will be hard to test all the posibility by our own. By that problem we can use our computer to help us test our app.
Computer is good at scaling and automation, so we can write a test case that cover all fungsionality we create and do the test automaticly for us.
Scaling
As I mention above, scaling mean the test can be created incrementally. When we creating our app from the scratch, it’ll be better if every functionality we create in our app, we also create the test script. Later we will integrate our test to the larger test so with this way we’ll cover all of our app test little by little. In the end, our app will be entirely covered by all the test we create.
Automation
Not only for scaling our test, computer also good at automate our test. we can easly run the test and the computer will do it for us.
not only that, as a mobile developer especially Android, there are a lot of variation of Android phone (screen size, hardware, android version, ect)
that can lead to error. In order to scope all posibble phone out there, we can use automation and do the test in service like (Firebase Test Lab) that provide a lot of (real) phone and emulator for us to test.
Testing in Android Studio
By all that problem, Android Studio is designed to make testing simple, android framework has already created a package for testing,
there is test and androidTest package, you can find it below the main package.
AndroidTest responsible for the test that using android context, like UI testing, database testing, and ect.
On the other hand, test package is testing by using JVM that doesn’t requre android context, so it will be easier and run faster.
Architecture That Suit For Testing
We know that Google has give us Android jetpack as a guidiance to create a good & solid app, that also mean that the architecture is suit for testing.
with MVVM arcitecture, we know there is a seperation like the view, viewModel, repository, and the data retriever (API or Database)
this seperation make the testing easier, and independent from one another.
So let’s see how to implement all the above knowledge we have and test our application here I use the project from Philipp Lackner tutorial that I have create on my github repository here link.
So let’s begin!
Unit Test
Before writing the viewModel test case, we have to create the Fake Repository for testing because we will Neither use a database connection nor internet connection, but we will use our own data source, so we can expect every result of our test based on the datasource we have.
Fake Repository
Like what I said before, because we will test the viewModel logic, we have to change the Repository with the Fake Repository because we will use our own data source.
Here we have two observable that will be observe with the viewModel, we dont have to really use a network call to get the data. We can just make a temporary list data ex: “shoppingItems” for our data source, then we can simulate the repository transaction process.
It’s better to make an interface that contain the function we want to use and test (abstraction concept).
class FakeShoppingRepository : ShoppingRepository {private val shoppingItems = mutableListOf()private val observableShoppingItem = MutableLiveData>(shoppingItems)private val observableTotalPrice = MutableLiveData()private var shouldReturnNetworkError = falsefun setShouldReturnNetworkError(value: Boolean){shouldReturnNetworkError = value}private fun refreshLiveData(){observableShoppingItem.postValue(shoppingItems)observableTotalPrice.postValue(getTotalPrice())}private fun getTotalPrice(): Float{return shoppingItems.sumByDouble { it.price.toDouble() }.toFloat()}override suspend fun insertShoppingItem(shoppingItem: ShoppingItem) {shoppingItems.add(shoppingItem)refreshLiveData()}override suspend fun deleteShoppingItem(shoppingItem: ShoppingItem) {shoppingItems.remove(shoppingItem)refreshLiveData()}override fun observeAllShoppingItems(): LiveData> {return observableShoppingItem}override fun observeTotalPrice(): LiveData {return observableTotalPrice}override suspend fun searchForImage(imageQuery: String): Resource {return if(shouldReturnNetworkError){Resource.error("Error", null)} else {Resource.success(ImageResponse(listOf(), 0, 0))}}}
ViewModel
From the fake repository above, now we can test our ViewModel, by calling the FakeRepository and test it with the test library like Truth for asserting the value change in viewModel. if the viewModel value changed and equal with what we are expected, it mean our test is successful.
if we write the funtion name on our test case, it’ll be better if the function name is describing the test we want to do and the expected result.
@ExperimentalCoroutinesApiclass ShoppingViewModelTest {@get:Rulevar instantTaskExecutorRule = InstantTaskExecutorRule()@get:Rulevar mainCoroutineRule = MainCoroutineRule()private lateinit var viewModel: ShoppingViewModel@Beforefun setup(){viewModel = ShoppingViewModel(FakeShoppingRepository())}@Testfun "insert shopping item with empty field, return error"(){viewModel.insertShoppingItem("name", "", "3.0")val value = viewModel.insertShoppingItemStatus.getOrAwaitValueTest()assertThat(value.getContentIfNotHandled()?.status).isEqualTo(Status.ERROR)}@Testfun "insert shopping item with too long name field, return error"(){val string = buildString {for(i in 1..(Constants.MAX_NAME_LENGTH + 1)){append(1)}}viewModel.insertShoppingItem(string, "5", "3.0")val value = viewModel.insertShoppingItemStatus.getOrAwaitValueTest()assertThat(value.getContentIfNotHandled()?.status).isEqualTo(Status.ERROR)}@Testfun "insert shopping item with too long price field, return error"(){val string = buildString {for(i in 1..(Constants.MAX_PRICE_LENGTH + 1)){append(1)}}viewModel.insertShoppingItem("name", string, "3.0")val value = viewModel.insertShoppingItemStatus.getOrAwaitValueTest()assertThat(value.getContentIfNotHandled()?.status).isEqualTo(Status.ERROR)}@Testfun "insert shopping item with too high amount, return error"(){viewModel.insertShoppingItem("name", "999999999999999999999999999", "3.0")val value = viewModel.insertShoppingItemStatus.getOrAwaitValueTest()assertThat(value.getContentIfNotHandled()?.status).isEqualTo(Status.ERROR)}@Testfun "insert shopping item with valid input, setCurrImageUrl() reset to "" & return success"(){viewModel.insertShoppingItem("name", "5", "3.0")val value = viewModel.insertShoppingItemStatus.getOrAwaitValueTest()assertThat(viewModel.curImageUrl.value).isEqualTo("")assertThat(value.getContentIfNotHandled()?.status).isEqualTo(Status.SUCCESS)}}
Instrumented Test
Now we want to test the physic of our Android phone or Emulator, so we have to placed the test in androidTest package, but it will need a little adjustment because we are using single activity architecture.
1. Create an Activity Container to hold the fragment we want to test
A single activity architecture require a single activity container to host all the fragment. we can use the MainActivity but
it will give us the MainActivity attribute and function that we may not needed, so it’ll better to create an Activity that just host a fragment for testing.
so here it is how to create it
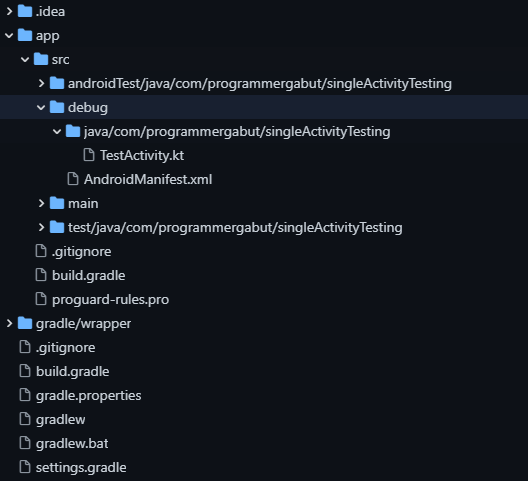
- (Create a debug directory) Change the view of the android folder from Android view to Project view
- Uncheck compact middle packages
- In src dir, add new directory and name it “debug”
- Inside “debug” directory, create java folder
- Inside the “debug/java” directory create a by following the package name you create in main directory
- Create a new kotlin file or class, and create class called “TestActivity”
- and extend the class with AppCompatActivity() and also anotate it with @AndroidEntryPoint
@AndroidEntryPointclass TestActivity: AppCompatActivity()
And also copy our manifest file, and paste it in, so the structure will be like this
inside the manifest file, delete most of the xml and leave the permission depedency, and just register the TestActivity with exported=“false”.
//permission ---<application><activity android:name=".TestActivity"android:exported="false"/></application>
3. Create an Ext file
Inorder to run the test in an fragment, we need to create a custom function to run it.
We will call this launchFragmentInContainer to create the test fragment and pass the fragment we want to test.
@ExperimentalCoroutinesApiinline fun launchFragmentInContainer(fragmentArgs: Bundle? = null,themeResId: Int = R.style.FragmentScenarioEmptyFragmentActivityTheme,fragmentFactory: FragmentFactory? = null,crossinline action: T.() -> Unit = {}){val mainActivityIntent = Intent.makeMainActivity(ComponentName(ApplicationProvider.getApplicationContext(),TestActivity::class.java,)).putExtra(FragmentScenario.EmptyFragmentActivity.THEME_EXTRAS_BUNDLE_KEY, themeResId)ActivityScenario.launch(mainActivityIntent).onActivity { activity ->fragmentFactory?.let {activity.supportFragmentManager.fragmentFactory = it}val fragment = activity.supportFragmentManager.fragmentFactory.instantiate(Preconditions.checkNotNull(T::class.java.classLoader),T::class.java.name)fragment.arguments = fragmentArgsactivity.supportFragmentManager.beginTransaction().add(android.R.id.content, fragment, "").commitNow()(fragment as T).action()}}
4. Create a TestRunner
Because we are using single Activity, then we have to use the TestRunner for our Application Runner, inorder to call our test Application class, here because I am using Dagger Hilt so I call HiltTestApplication, but if you use other DI or not using any DI, you can create a custom class that extend Application and do the ijection on your own.
- Create TestRunner
class TestRunner: AndroidJUnitRunner() {override fun newApplication(cl: ClassLoader?,className: String?,context: Context?): Application = super.newApplication(cl, TestApplication::class.java.name, context)//change the className -> TestApplication::class.java.name}
- Change the Build.Gradle Application Level defaultConfig from. testInstrumentationRunner “androidx.test.runner.AndroidJUnitRunner” -> “com.programmergabut.singleActivityTesting.TestRunner”
- Test our fragment
Now this is the example of the Fragment AddShoppingItem instrumental test, we can see the test scenario below is trying to replace the editText with the decided value, then it will click buttonAddShoppingItem, after that it will try an assertion that the new value is contained in the viewModel
@ExperimentalCoroutinesApiclass ShoppingViewModelTest {@get:Rulevar instantTaskExecutorRule = InstantTaskExecutorRule()@get:Rulevar mainCoroutineRule = MainCoroutineRule()private lateinit var viewModel: ShoppingViewModel@Beforefun setup(){viewModel = ShoppingViewModel(FakeShoppingRepository())}@Testfun "insert shopping item with empty field, return error"(){viewModel.insertShoppingItem("name", "", "3.0")val value = viewModel.insertShoppingItemStatus.getOrAwaitValueTest()assertThat(value.getContentIfNotHandled()?.status).isEqualTo(Status.ERROR)}@Testfun "insert shopping item with too long name field, return error"(){val string = buildString {for(i in 1..(Constants.MAX_NAME_LENGTH + 1)){append(1)}}viewModel.insertShoppingItem(string, "5", "3.0")val value = viewModel.insertShoppingItemStatus.getOrAwaitValueTest()assertThat(value.getContentIfNotHandled()?.status).isEqualTo(Status.ERROR)}@Testfun "insert shopping item with too long price field, return error"(){val string = buildString {for(i in 1..(Constants.MAX_PRICE_LENGTH + 1)){append(1)}}viewModel.insertShoppingItem("name", string, "3.0")val value = viewModel.insertShoppingItemStatus.getOrAwaitValueTest()assertThat(value.getContentIfNotHandled()?.status).isEqualTo(Status.ERROR)}@Testfun "insert shopping item with too high amount, return error"(){viewModel.insertShoppingItem("name", "999999999999999999999999999", "3.0")val value = viewModel.insertShoppingItemStatus.getOrAwaitValueTest()assertThat(value.getContentIfNotHandled()?.status).isEqualTo(Status.ERROR)}@Testfun "insert shopping item with valid input, setCurrImageUrl() reset to "" & return success"(){viewModel.insertShoppingItem("name", "5", "3.0")val value = viewModel.insertShoppingItemStatus.getOrAwaitValueTest()assertThat(viewModel.curImageUrl.value).isEqualTo("")assertThat(value.getContentIfNotHandled()?.status).isEqualTo(Status.SUCCESS)}}
So that’s what testing in Android app that using Single Activity. if you want some example please visit my github and see this repository link.
Thank you for visiting this post!